

Hi everyone!
Are you one of those girls who likes adding filters or effects on your photos? Well, me? yes!, I am one of those girls.I sometimes add effects on some of my pictures that i share on facebook, often times in pictures I put as my display picture. I add effects to the photo so the resolution would sum up a bit and also it's fun and eye-catching! :)
Nowadays, there's so many apps where you can add effects by just tapping your phone's screen and there are so many effects to choose from, like the famous camera 360 app. But, before all of those was ever created, there's this process which you can simply do in adobe photoshop. This post will show you how to acheive the filter effect without the use of android phones or the internet. just your plain computer and yourself and of course adobe photoshop :D
the filter effect that we will be doing is called "cross process" if i am not mistaken ^______^V...
so without further ado, let me show you guys the phases to attain the said effect ^_______^

(sample picture with the effect)
+ so here's a sample picture where i operated the effect. I was the one who captured this and since my sister loves posing and enhancing her photos by adding filters, i decided to use this photo as an example on how i got this effect :D
NOTE: i am not a professional, so i won't really say that this is a tutorial. I just wanted to share you guys some of the simple things i know on photoshop :)
NOTE: i am not a professional, so i won't really say that this is a tutorial. I just wanted to share you guys some of the simple things i know on photoshop :)
WHAT YOU'LL NEED:
- Adobe PhotoShop (any version)
- your jaw-dropping picture *wink*
Let's begin! :))
STEP 1
- Open Photoshop. Press ctrl+O to open the file you wish to enhance.

STEP 2
- This is optional. The picture I am using is a bit dark. Press ctrl+M. A panel will pop out, this is called "curves"--this option will help you darken or lighten your photos.

STEP 3
- As you can notice, there's a slant line at the middle of the box panel.
- toggling the slant line in a downward motion will darken the image, and in a upward motion to lighten it.
(refer to the gradient at the left and at the bottom side of the panel)
- click the Okay button if you are done.

(click on the photo to enlarge)
STEP 4
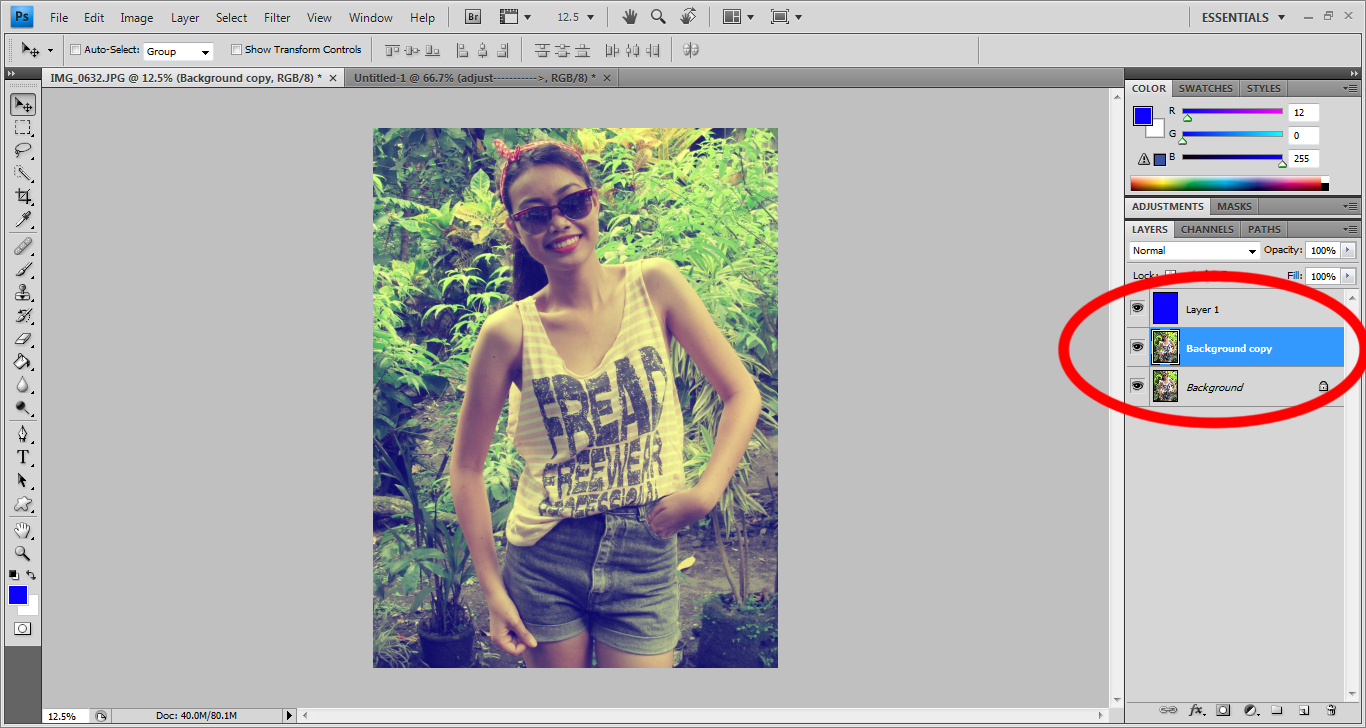
- click the small square at the bottom part where the layers are placed. This option will create a new layer.

(click on the photo to enlarge)
STEP 5
- now, click on the color palette located on the tool box, drag the arrow and pick blue.
- you can choose blue or light blue, this will have the same effect only lighter.
- again. press Okay when done.

(click on the photo to enlarge)
STEP 6
- select the paint bucket tool and fill the layer you have created.

(click on the photo to enlarge)
STEP 7
- now, click the drop-down menu placed at the layer panel, and choose "exclusion".

STEP 8
- adjust the opacity, the opacity menu is placed next to the drop-down menu.
(I adjusted mine at 40%)

STEP 9
- click the layer of your picture and press ctrl+J.
- this will duplicate the layer.
(click on the photo to enlarge)
STEP 10
- hold the picture you have duplicated and drag it on top of "Layer 1"
- repeat the process of Step 7 but, this time select "Softlight"

Step 11
- again adjust the opacity.
(I adjusted mine on 70%)

Step 12 (final step)
- When you're happy with the result press ctrl+Shift+E, this is the shortcut key to merge all layers.
If not, you can adjust the opacity on layers you want to adjust.
- make sure to merge all layers before saving. press ctrl+S to save the picture and replace the original image or ctrl+Shift+S, this will give you the "save as new" option, choose this option if you don't want the original picture to be replaced. Just make sure to save it with different file names so your computer won't get confused hihi.
- and you're done! *wink*
- i hope this post is still useful hehe
thank you for stopping by, i'll se you guys on my next post! ^____^


No comments:
Post a Comment